Sunday, 19 September 2010

Enable Google Chrome's hidden PDF reader

I had a download manager I used a while ago in order to test RTMP downloading (it failed!), and it has been annoying me for a while, intercepting some Chrome Downloads.

I tried looking through the extensions menu, but could not see it listed so I was a bit confused on how it was doing this.

So, I uninstalled the software and then the next time I did a download, I got to a page that said "Missing plugin".

Having another look in the menu, I cannot see anywhere to configure plugins, only extensions - The extension page is "Chrome://extensions", so I took a stab in the dark and typed "Chrome://plugins" and it worked!

On this page, I was able to fully remove the plugin I no longer wanted, but I got a surprise and found "Chrome PDF Viewer"

I disabled Adobe PDF reader and enabled this.

On it's first run, it is a little slower (I guess the plugin was starting), but once it was loaded, everything about it is much faster and it enables me to highlight and copy text in PDFs where Adobe's reader sometimes fail.

I have no idea why this is disabled by default, but I am certainly going to be using this from now on. Lets just hope Google come out with a Flash alternative soon!

Connecting Ubuntu (or other distributions) to a Windows Server VPN

After someone said about the Microsoft VPN Server being locked to Microsoft clients, I decided to give it a further look. Long story short, it works fine! Here is how to do it:

I tested using an Ubuntu Live disk.

I went to "System" on the menu, then "Preferences" and then "Network Connections".

Select the "VPN" tab and add a new connection.

Type the address and username. You can type the password if you do not want to type it each time.

By default, Ubuntu does not use VPN encryption, so this option needs to be turned on under the advanced option.

Then, select the network menu near the top right hand corner, go down to VPN and connect.


If you have a Windows Server and have not set up VPN access yet, read this guide to get it going in less than five minutes!

Friday, 17 September 2010

Fix no / invisible / blank picture in Tweetdeck, Seesmic or other twitter clients.

From time to time, I see tweets in Tweetdeck (the client I am using) from people who do not seem to have a profile picture.

Took me a while to figure it out. Whilst Twitter itself allows you to upload .JPG, .BMP or .PNG pictures, for some reason, twitter clients only like .JPG files.

If you or someone you know is having this problem, simply go here - http://twitter.com/settings/profile and change your picture to .JPG

If you do not know how to convert your picture, the easiest way is to go to your Twitter page and download your big profile picture, then use a service such as this that will do it for you or alternatively, open it in Paint (or any image editor) and choose save as, and choose .JPG image.

Now upload this new image, and it should be fixed!

In Tweetdeck (possibly others), your picture is drawn as and when you Tweet, you will only see the picture from this point on and not for previous tweets.

Many thanks to @Blowdart for telling me that I was one of the people who had this - I simply had no idea and not sure how anyone would know that they are affected unless someone has told them.

Thursday, 9 September 2010

How to configure Windows VPN in less than 5 minutes!

There are many software and hardware solutions out there that allow VPN connections in to your home network. Some of these solutions are free and lightweight, however (perhaps foolishly), I have just never trusted them as they usually go via a third party service.

I have always wanted to have proper VPN access to my home network but have just never got around to it for one reason or another, however, I have a machine doing nothing here and I thought it was about time... and it is seriously so easy to do, I wish I had done it sooner!

With this guide, you should be able to get a full Windows VPN tunnel set up in less than 5 minutes!

For Windows Server 2003 Server go to 2b.
For Windows Server 2008, read below.


1. To start, In Windows 2008, you have to go to server manager and install the following roles:

[ ] Network Policy and Access Services [NPAS]
[ ] Network Policy Server [NPAS-Policy-Server]
[ ] Routing and Remote Access Services [NPAS-RRAS-Services]
[ ] Remote Access Service [NPAS-RRAS]

2 a). Next, Go to computer Management and expand Services and Applications.

2 b). (For Windows Server 2003) Go to "Administration tools" > "Routing and Remote Access"

2 c). Right click and choose "Configure and Enable Routing and Remote Access"


3. The predefined VPN templates require two network cards and if you only have one, it will come up with an error. I am unsure why as it is not actually required. To continue, choose the "Custom Configuration" option.

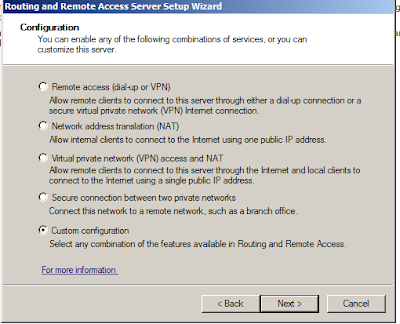
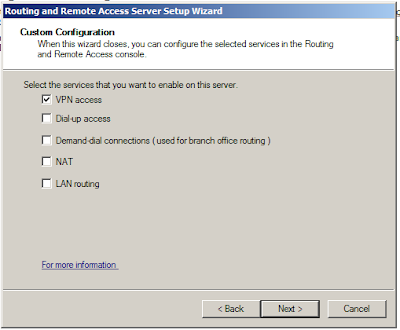
4. Select the "VPN access" option.
5. Confirm your selection and finish the wizard

6. By default, Routing and Remote Access will pass DHCP requests through, however, I have encountered mixed results through this option (I think due to gateway settings), and prefer selecting the "Static Address Pool" option which I also think is a lot faster at connecting.

You can configure this by right clicking on the computer (where you clicked above in stage 2c) but this time choose properties, and go to the IP tab.

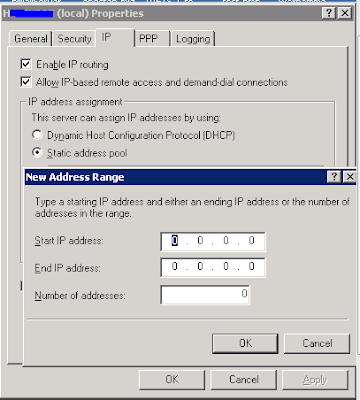
Assign as many IPs as concurrent VPN connections you want - make sure they are working IPs within your current subnet. If they are covered by your current router (or DHCP server) and you are not able to setup exclusions, you can simply make DHCP reservations for fictional MAC addresses and that will keep them unregistered by DHCP clients.

7. Go to Computer Management > Users and groups and create a new user. Make sure that you allow remote access in the "Dial in" tab.

8. At your firewall/router, make sure that UDP port 500 (IPsec) and TCP port 1723 (PPTP) are forwarded to the server.

And that's it! Done!


If you are not sure how to create a VPN connection to the server in Windows, follow this guide (For Windows 7/2008):

Go to "Network and Sharing center" and choose "Setup a new connection or network" option.

Simply type the ip address of your server, and the username and password that you set up (leave domain blank) and you are done!


Under the quick connections menu on the taskbar, you will be able to easily connect to the VPN whenever you want (and when outgoing ports are not blocked!)

I did a quick speed test when out and about and was able to reach a download speed of my home upload speed! It works very well and is satisfying to see my own IP address on IP checking sites!


FYI - I love everything I have seen about DirectAccess - it is a far superior solution, but I simply do not have the infrastructure at home to support it. Hopefully in the future, I will be able to deploy it and write a similar guide (although I think it will be more than 5 minutes work!)

*Windows Server 2008 Web edition is not supported, It requires the Remote Access role to be installed.

Tuesday, 23 March 2010

Netgear wireless devices disables XP welcome screen

Over the past few months, I have had so many jobs in for repair because people think that there is a problem with their machine as the Windows XP welcome screen disappears and instead the classic logon screen / Domain login screen is there instead.

To fix this, simply open up registry editor and navigate to

HKEY_LOCAL_MACHINE\Software\Microsoft\Windows NT\Current Version\winlogon

From here you should see a key called Ginadll with a value of mrvgina.dll - Simply delete this and you should instantly see the welcome screen.

There are quite a few Netgear products that come with this driver and I have no idea why - it doesn't seem to do anything and everything works fine when the key is deleted.

If you do not want to do this manually, here is a .reg file to run which should do the same job: http://ezpcltd.com/netgeargina.reg

Hope this helps you!

As this has been quite a little earner with a lot of jobs, I wasn't sure to publish this, but I think the sort of person who would self-fix wouldn't come to someone like me for a repair anyway... and I want this blog to be a honest source of good information!

Thursday, 11 February 2010

BT peak hours change

Just seen the interview with a man from BT on Working Lunch Iplayer Link (Valid for 7 Days).

Basically, BT are changing the off peak hours from its current time of 6PM-6AM to a new time of 7PM-7AM.

What a load of rubbish! I understand what the bloke from BT was saying on the show - and on Working Lunch, the figures were about making call every day - however, I am not that different.

I usually make a 10-20 minute call every other day at around 6:30, this is currently completely free with BT - now I will be paying about £15 a month for these calls unless I sign up to their any time package at £4.99 a month.

I think that is just a way of getting cash from people who do not know about this change or a way of forcing people on to their £4.99 a tariff.

I have long hated BT, but I am on a LLU internet package that I love and there is little other choice. Personally, I think I would rather change my habit and make my calls after 7:00 instead rather than give a penny more to BT. How they can defend their position and say that not many people make calls straight after 6:00, I have no idea.

Thursday, 26 November 2009

Delete Windows 7 Search History (And customise!)

A question just came up on SuperUser.com where a user asked the following:

Windows 7 - Make Windows Explorer Never Remember Search Terms


You know the handy search bar on the top right of Explorer. I find it irritating that it always remembers search terms. I feel like, people can easily intrude into my computer since they know what documents I'm searching for.

Is there any way to disable it?


So... I remember the search being the third tab within the re-done folder options dialog, however I could not see the ability to disable search or delete the history. I looked a bit further at some other options, but could not find it anywhere (Including a quick look in group policy).

I ran Microsoft/Sysinternals Process Monitor and found that the following location is where the search results are stored :

HKEY_CURRENT_USER\Software\Microsoft\Windows\CurrentVersion\Explorer\WordWheelQuery

So, to cut it short, you can delete any entry within this key without breaking anything - The entire key simply does not exist on a fresh Windows install. But, to disable search history entirely simply right click the key (In the left folder view) and click Permissions, Click add then type everyone and click ok. Click on the Deny box next to "Full Control", and you should see something like the following:

Simply Click ok and done! If you go to any Windows Explorer folder and click on search, there will not be ANY results from previous searches and more importantly, it won't remember anything you type in the future.

Whilst this is job done, I wanted to take this a step further and see if it is possible to add predefined search terms whilst preventing Windows from writing new entries - Long story short, I failed!

I understand how the entire registry key works, You simply add a new Binary value with a sequential number, write your search term and add a 00 in-between each letter followed by three 00's at the end. For example:


Lastly, I think for the last item - MRUListEx, you simply need to add followed by three 00's. For example, With three entries, MRUListEx looks like:

And with four, it looks like:

Anyway, I tried simply disabling the ability for everyone to write, however it seems to disable all history despite effective permissions confirming that there is still permission to read. I spent a good few minutes on this but I just have a lot of work to do today - This is something I want to revisit when I have more time to spare!